Failure Analysis of Cracking in a 16MnⅢ Weld Neck Flange
Abstract: This study investigates the cause of cracking in a 16MnⅢ weld neck flange installed in a natural gas transmission pipeline. Chemical composition analysis, metallographic examination, mechanical property testing, scanning electron microscopy, and energy-dispersive spectroscopy revealed that the flange base metal exhibited an abnormal microstructure, characterized by a networked distribution of ferrite and the presence of Widmanstätten structures. The flange material exhibited high hardness with low ductility and toughness, and the fracture surface displayed cleavage features indicative of brittle fracture, with a substantial covering of black Fe3O4. Analysis of the flange manufacturing process revealed that overheating during forging, combined with inappropriate cooling rates during subsequent normalizing and air cooling, generated significant thermal stresses at abrupt cross-sectional changes, ultimately causing brittle cracking. A weld neck flange is a flange with a neck and a tapered transition to the pipe, welded directly to the pipeline. It provides benefits such as easy installation, high strength, and excellent load-bearing capacity. It is suitable for pipelines with large pressure or temperature fluctuations, as well as for high-temperature, high-pressure, or low-temperature service, and is commonly used in pipelines carrying valuable, flammable, or explosive media. 16Mn steel is a low-alloy steel with excellent machinability and mechanical properties, low smelting costs, and is widely used to manufacture flanges for industries such as power generation, water conservancy, and pipeline fittings. Therefore, it is commonly chosen for manufacturing weld neck flanges to lower production costs. With the growing share of natural gas consumption in China, the safety and reliability of natural gas transmission pipelines—the main mode of transporting natural gas—have become critical concerns. Pipeline leaks present serious safety hazards and can trigger major accidents, including explosions, putting lives and property at risk. Flange connections are critical weak points prone to natural gas leaks, making it essential to analyze flange failure causes to prevent pipeline leakage and ensure safe and reliable gas transmission.
A crack was detected on the conical neck near the weld joint of a weld neck flange at the outlet end of a natural gas pipeline system. The flange is specified as WN600(A)-600 RF and is made of 16Mn II steel, with its chemical composition and mechanical properties meeting the requirements outlined in Table 3 (16Mn) of standard NB/T 47008-2017. A weld neck flange, featuring a neck and a tapered transition to the pipe, is welded directly to the pipeline, offering benefits such as easy installation, high strength, and superior load-bearing capacity. It is suitable for pipelines experiencing large pressure or temperature fluctuations, as well as high-temperature, high-pressure, or low-temperature operating conditions, and is commonly used for transporting valuable, flammable, or explosive media. 16Mn steel is a low-alloy structural steel with excellent machinability and mechanical properties, and it is relatively low in smelting cost. Consequently, 16Mn flanges are widely used in the electric power, water conservancy, and pipeline fitting industries, making it a cost-effective choice for weld neck flanges. As natural gas accounts for an increasing share of China’s energy consumption, ensuring the safety and reliability of natural gas transmission pipelines—the main mode of transport—has become a critical concern. Even a small leak can pose serious safety risks and may result in severe accidents, such as explosions, endangering both lives and property. Because flange connections are among the most leak-prone components in natural gas systems, analyzing the causes of their failures is essential to prevent potential leaks. The pipeline system in which the crack occurred was commissioned in December 2020. It has a design pressure of 10 MPa and carries natural gas at ambient temperature. The operating pressure remains relatively stable at around 2.8–3.5 MPa. The pipeline transports natural gas from the upstream network, and no abnormal vibrations were detected near the cracked flange.
A circumferential crack was detected at the weld joint, located near both the weld toe and the conical-neck side of the flange. The crack is situated within and adjacent to the abrupt cross-sectional transition between the straight hub and the conical neck, and it does not extend through the inner wall. The crack extends from one end toward the weld and from the other end toward the conical neck, with a total length of approximately 650 mm. It shows no significant branching, and the crack opening is relatively narrow (Figures 1(a–b)). Longitudinal-section samples were taken from areas of the flange where no visible cracks were present. Etching the weld joint with 4% nitric acid in alcohol revealed a V-groove weld configuration. Coarse grains were observed in the flange base metal near the weld (Figure 1(c)). Crack samples 1# to 3#, shown in Figure 1(a), were manually opened for examination. The fracture surfaces were rough, mostly black, and devoid of metallic luster, with localized rust-red areas near the crack openings. Comparison of specimens 1# through 3# revealed that the original cross-sectional area and the rust-red regions progressively increased along the depth, indicating a corresponding increase in crack depth. Since sample 3# was nearest to the crack initiation zone, it is inferred that the crack originated at the surface of the flange’s conical neck rather than within the weld zone (Figure 1(d)).

(a) Overall flange appearance (b) Crack tip (c) Welded joint of the flange (d) Crack cross-section
Figure 1. Macroscopic observations of the failed flange
A sample of the flange base metal was analyzed to determine its chemical composition, as shown in Table 1. The composition complies with the technical requirements of the applicable standard.
Table 1. Chemical composition of the 16MnⅢ flange base material (%)
|
Sampling location |
C |
Mn |
P |
S |
Ni |
Cr |
Cu |
|
Flange base material |
0.16 |
1.38 |
0.020 |
0.017 |
<0.008 |
0.012 |
0.08 |
|
Standard requirements |
0.13–0.20 |
1.20–1.60 |
≤0.025 |
≤0.010 |
≤0.30 |
≤0.30 |
≤0.20 |
Longitudinal specimens of the flange ring base material underwent tensile testing at room temperature. The results are summarized in Table 2. According to the standard technical requirements, the flange meets the specified yield strength, while its tensile strength is relatively high and the fracture elongation is slightly below the specified value.
Table 2. Tensile test results
|
Sampling location |
Material |
ReL / MPa |
Rm / MPa |
A / % |
Yield strength ratio |
Standard technical requirements (nominal flange thickness 100–200 mm) |
|
Flange ring (base material) |
— |
— |
— |
— |
— |
≥295 (ReL), 470–620 (Rm), ≥20.0 (A) |
Longitudinal specimens were extracted from the weld zone, the heat-affected zone (HAZ) of the flange weld, and the flange ring for Charpy impact tests conducted at 0 °C. The results, shown in Table 3, indicate that the flange base material has an impact absorption energy well below the standard requirement. By contrast, the impact absorption energies of the weld metal and the heat-affected zone on the flange side comply with the technical requirements outlined in Table 4 of NB/T 47016-2011, the applicable standard for pipeline construction.
Table 3. Charpy impact test results at 0 °C
|
Sampling location |
Impact absorbed energy KV (J) |
Standard requirement (KV, J) |
|
Flange ring (base material) |
12.9 |
≥41 |
|
Weld joint (weld zone) |
100.8 |
≥24 |
|
Weld joint (HAZ) |
150.1 |
≥24 |
Brinell hardness testing of the flange base material was performed, and the results are presented in Table 4. The hardness of the base material exceeds the limits specified by the standard technical requirements.
Specimens were extracted from the flange weld joint, base material, and crack sites. The results of Brinell hardness testing are summarized in Table 4.
Table 4 Brinell hardness test results
|
Material |
Hardness value (HBW 10/3000) |
Standard technical requirements (HBW) |
|
Flange base material (16Mn) |
200 / 201 / 200 |
128–180 |
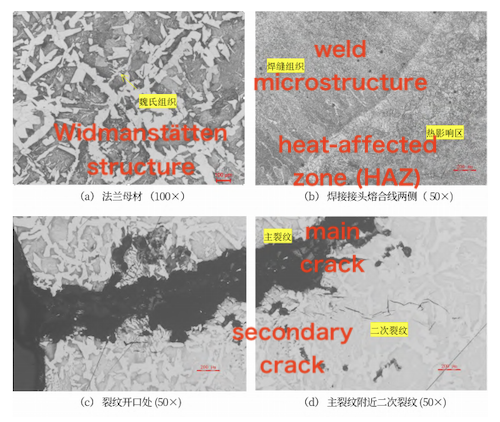
The base material is composed of blocky ferrite and pearlite arranged along the grain boundaries in a star-like pattern, with a clearly observable Widmanstätten structure. Martensite is observed in the heat-affected zone (HAZ) adjacent to the base-metal side of the weld fusion line, whereas the weld metal exhibits a ferrite–bainite microstructure. The crack extends inward from the surface, with its longitudinal tip reaching the conical neck of the flange. The primary crack is transgranular, accompanied by multiple secondary transgranular cracks in its vicinity. No apparent decarburization is detected in the vicinity of the crack (Figures 2(a)–(d)).

Figure 2 Metallographic analysis of the flange base material, welded joint, and crack regions
Flange base material (100×) (b) Both sides of the weld fusion line (50×)
(c) Crack opening (50×) — showing the main crack and secondary cracks (d) Secondary crack near the main crack (50×)
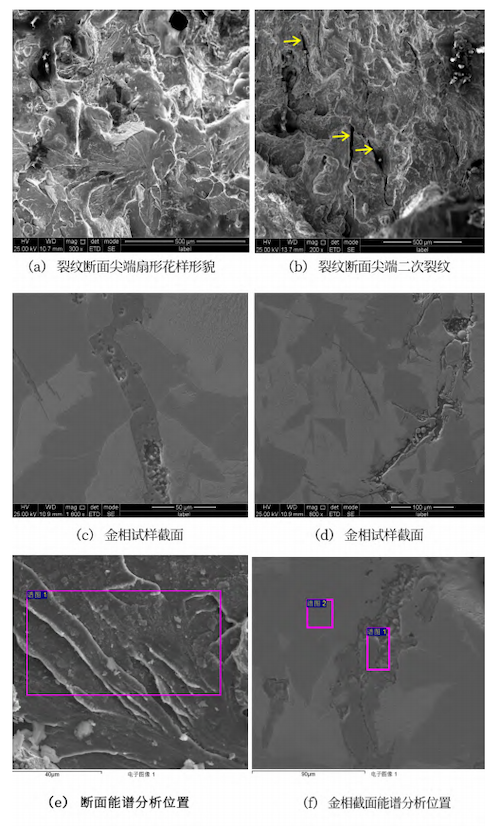
Scanning electron microscopy of the crack cross-section revealed a fan-shaped pattern at the crack tip with several secondary cracks. The fracture surface exhibits characteristic cleavage fracture morphology (Fig. 3(a)–(b)). Metallographic examination of the cross-section revealed a substantial amount of foreign filler material within the main crack, with similar material present in the adjacent secondary cracks (Fig. 3(c)–(d)). Energy-dispersive X-ray spectroscopy (EDS) analysis indicated that the primary constituents on the crack fracture surface were Fe (80.1 wt%) and O (17.9 wt%), with no corrosive elements identified. The filler material observed in the metallographic cross-section was primarily composed of Fe (66.7 wt%) and O (31.8 wt%) (Table 5).

Figure 3 Morphology and energy dispersive spectroscopy analysis of the crack section
(a) Crack fracture morphology (b) Crack surface morphology and secondary crack (c) Metallographic specimen cross-section (d) Metallographic specimen cross-section (e) EDS analysis location 1 (f) EDS analysis location 2
Table 5 Results of EDS Analysis (wt%)
|
Spectrum Location |
Fe |
O |
Si |
Mn |
C |
|
Fig. 3(e), Spectrum 1 |
80.1 |
17.9 |
1.4 |
0.3 |
0.3 |
|
Fig. 3(d), Spectrum 1 |
66.7 |
31.8 |
0.8 |
0.7 |
— |
|
Fig. 3(f), Spectrum 2 |
97.3 |
1.6 |
0.5 |
0.6 |
— |
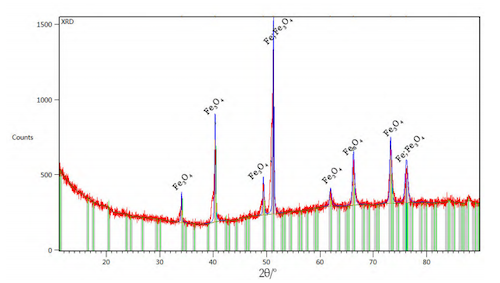
X-ray diffraction (XRD) of the darkened area on the crack fracture surface indicated that the main phases were FeO and Fe (Fig. 4).

Figure 4 X-ray diffraction phase analysis of the crack section
(1) While the chemical composition of the flange base material complies with the standard technical requirements, its microstructure and mechanical properties are atypical. The base material consists of blocky ferrite and pearlite arranged along the grain boundaries, with a clearly observable Widmanstätten structure. The measured hardness is excessively high, and the impact absorption energy is well below the standard requirements. The observed Widmanstätten structure suggests overheating during forging, representing a metallurgical defect that degrades toughness, diminishes plasticity, and heightens the risk of brittle fracture.
(2) Cracks occur in the abrupt transition between the straight edge and the tapered neck of the flange, which represents a geometric stress concentration zone. Macroscopically, the cracks exhibit no significant branching, and the flange shows no observable deformation, consistent with brittle fracture behavior. The crack tip exhibits a fan-shaped cleavage fracture pattern, suggesting that the material underwent brittle fracture under normal service stress.
(3) Metallographic analysis shows that the crack propagates transgranularly, and no evidence of decarburization is present in the vicinity of the crack. Had the defect been a forging or raw-material crack, it would have opened during forging, allowing air exposure and resulting in decarburization on both sides. This indicates that the original steel contained no pre-existing cracks. The crack surfaces are coated with Fe₃O₄, compounds typically produced by the reaction of iron with oxygen at high temperatures. These observations indicate that the crack originated at elevated temperature or was subjected to a high-temperature environment after initiation. Considering the flange’s normal operating temperature, the cracking most likely occurred during post-machining heat treatment. Cracks related to heat treatment are generally quenching cracks and are linked to the presence of a martensitic microstructure. Nevertheless, the failed flange shows a ferrite–pearlite microstructure instead of martensite, confirming that the crack is not due to quenching. According to Xin et al., 16Mn steel forgings normalized at 920 °C and air-cooled exhibit a microstructure of blocky ferrite, Widmanstätten ferrite, and pearlite, with cleavage features on the impact fracture surface. At the same normalizing temperature, the tensile strength, yield strength, and hardness of 16Mn steel increase with the cooling rate following normalizing. The evidence suggests that the failed flange was subjected to a normalizing and air-cooling process, and that an excessively high air-cooling rate induced elevated thermal stress, leading to surface cracking during cooling.
In conclusion, overheating during forging led to the formation of a Widmanstätten structure in the flange base material, which diminished its plasticity and toughness. Crack initiation occurred in the geometric transition zone of the flange neck, where stress concentration is present. An excessively high cooling rate during the normalizing and air-cooling process induced elevated thermal stress, ultimately leading to brittle cracking at the stress concentration region.
The flange base material exhibits an abnormal microstructure characterized by Widmanstätten structures, suggesting diminished plasticity and toughness. Under thermal stress, brittle cracking originated at the geometric transition zone of the flange cross-section. The following measures are recommended to prevent recurrence of such failures:
(1) Refine the forging and heat-treatment procedures to avoid overheating, abnormal microstructural development, and the initiation of cracks in the flange base material.
(2) Enhance inspection procedures during pipeline construction and operation, incorporating hardness testing and metallographic analysis of incoming materials, particularly for similar or identical pipe fittings, to verify compliance of their mechanical properties and microstructure with applicable technical standards.
Related News
- Failure Analysis of Cracking in a 16MnⅢ Weld Neck Flange
- ANSYS Analysis for Anchor Flange Structural Optimization
- Flange Leakage in Hydrogen-Cooled Pipeline Systems of Thermal Power Plants
- Flange Sealing Technology and Installation Method for Hydrogenation Units
- Multi-Directional Die Forging Process for Horizontal Valve Bodies with Dual Flanges
- Structural Performance Analysis of Zirconium Pressure Vessel Lap Joint Flanges
- Low-Temperature Flange Sealing Solutions for Cryogenic Chemical Pipelines
- Innovative Technology for Automatic Alignment in Underwater Flange Assembly
- Stamped Steel Slip-On Flanges
- Design and Finite Element Analysis of Anchor Flanges for Oil & Gas Pipelines
